5.1 — The Form Element
The <form> element is the interactive gateway between the user and the server. It collects data from input controls, packages it into key‑value pairs, and sends it across the network to a backend service. This section covers every attribute that controls that journey.
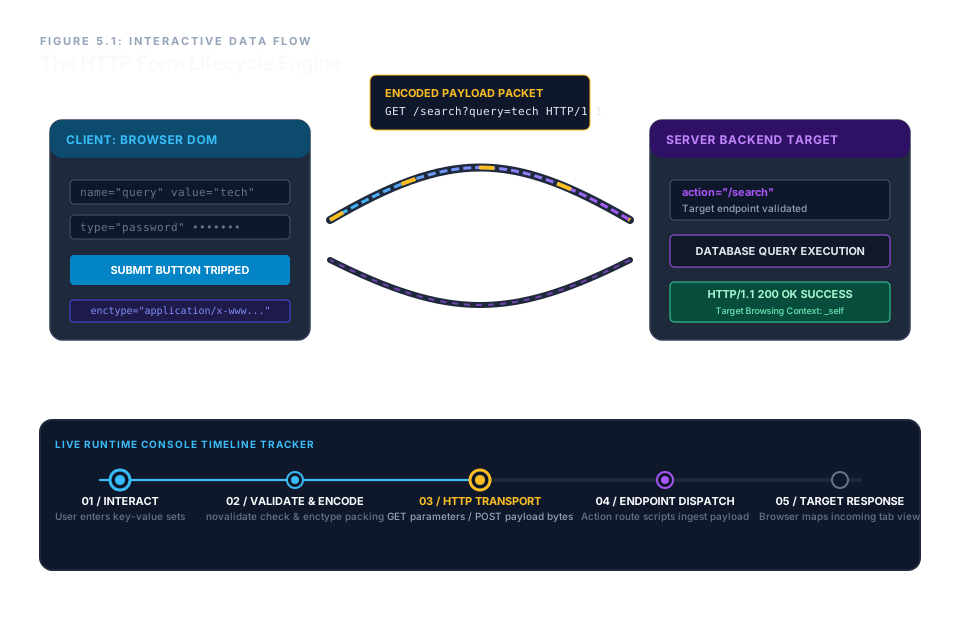
Building the Form Container
Always write the opening and closing tags together first, then fill in the attributes and controls. The basic skeleton:
<form> … </form>
Inside the opening tag, we configure the routing and transport rules. The most critical attribute is action, which specifies the URL or endpoint that will receive the data.
Core Routing Attributes
action – The Destination URL
The action attribute holds the address of the server‑side script or API that processes the form. If omitted, the browser sends the data back to the current page’s own URL.
<form action="https://example.com/login">
method – GET vs. POST
The method attribute defines the HTTP transport protocol. Choose between:
- GET – Appends form data to the URL as a query string (visible in the address bar). Suitable for searches and filters, but limited to ~2,048 characters and unsafe for passwords.
- POST – Sends data in the HTTP request body, hidden from the URL. No size limit. Required for logins, file uploads, and any write operation.
<form action="/search" method="get">

                <form action="/register" method="post">
GET form (submit and watch the URL change)
enctype – Media Encoding
When method="post", the enctype attribute specifies how the data is encoded. Three values are possible:
application/x-www-form-urlencoded(default) – spaces become+, special characters are percent‑encoded. Works for simple text fields.multipart/form-data– used when the form includes file uploads. The data is split into separate blocks, preserving binary files intact.text/plain– sends raw text, mostly for debugging; not used in production.
<form action="/upload" method="post" enctype="multipart/form-data">
POST form with file upload (non‑functional, just to show the input)
target – Browsing Context
Like links, forms can specify where the server’s response should open. Use _self (same tab, default) or _blank (new tab).
<form action="/results" target="_blank">
Validation and Configuration Flags
novalidate – Skip Client‑Side Checks
Adding the novalidate boolean attribute instructs the browser to bypass its built‑in validation (e.g., required fields, email patterns). The form submits raw input directly to the server.
<form action="/draft" novalidate>
autocomplete – Remember User Input
Set to on (default) to allow the browser to cache form values and suggest them later. Set to off for sensitive fields (e.g., credit card numbers).
<form autocomplete="off">
accept-charset – Character Encoding
Specifies the character set the server expects. Usually UTF-8. The browser translates the form data into this encoding before sending.
<form accept-charset="UTF-8">
name – Form Identification
The name attribute gives the form a unique identifier within the document, useful for scripting and multi‑form pages.
<form name="login-form">
| Attribute | Purpose | Example |
|---|---|---|
| action | Destination URL | action="/login" |
| method | HTTP verb (get / post) | method="post" |
| enctype | Encoding type for POST | enctype="multipart/form-data" |
| target | Where to open response | target="_blank" |
| novalidate | Skip client‑side validation | novalidate |
| autocomplete | Enable/disable browser cache | autocomplete="off" |
| accept-charset | Expected character set | accept-charset="UTF-8" |
| name | Form identifier | name="login-form" |
A Complete Form Shell
The following code assembles all the attributes into a realistic login form (non‑functional, but structurally correct). Observe how each attribute contributes to the data pipeline.
<form action="/authenticate" method="post"
      enctype="application/x-www-form-urlencoded"
      target="_self"
      autocomplete="on"
      accept-charset="UTF-8"
      name="login-form">

  <label for="username">Username:</label>
  <input type="text" id="username" name="user">

  <label for="password">Password:</label>
  <input type="password" id="password" name="pass">

  <button type="submit">Log In</button>

</form>
This shell will not actually send data (the action is a placeholder), but it demonstrates the correct assembly of the <form> element with all its attributes. In the coming sections, we will populate it with every kind of input control.
The <form> element is the conductor of an interactive orchestra. Master its attributes – action, method, enctype, target, novalidate, autocomplete, accept-charset, and name – and you control exactly how data flows from the user to the server. With this foundation, you are ready to wire in the full array of input controls.